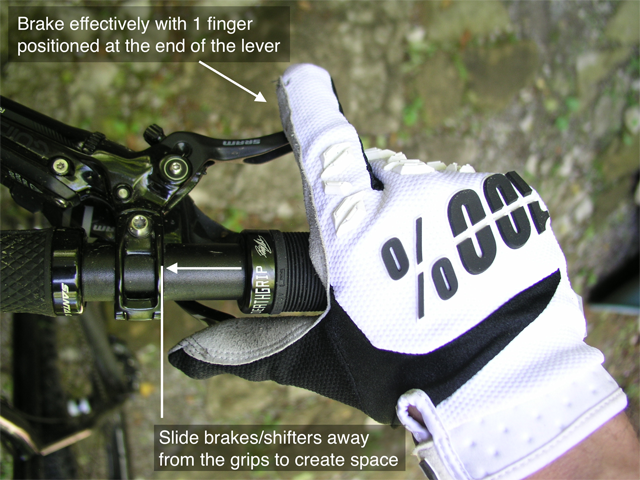
Adjust your shifter and brake lever positions to suit the size of your hands. The end of the brake lever is the most powerful spot to pull from.
In last month’s column, three points of contact were discussed – feet, seat, and hands. We covered the feet and the seat but never quite made it to the hands.
A rider’s hands are required to steer, brake, shift gears and change seatpost height, all while supporting a third to half of their body weight. Therefore, how they are positioned is vital for control, comfort, and safety.
Good hand positioning begins in the arms. Seated or standing, riders should be looking for a small amount of bend in their elbows. Enough to allow for a comfortable range of motion for steering and shock absorption without ever feeling too cramped. If the rider’s upper body is too stretched they won’t be comfortable on longer rides and will likely experience some form of back or shoulder pain.
Different frame and stem sizes will increase or decrease the rider’s reach. Cyclists can’t easily change their frame size but swapping out a stem is easy and cheap and can make a big difference in a bike’s fit and handling.
Adult hand sizes vary substantially and the positioning of a rider’s shifters and brake levers should change in relation to their hand size. New bikes are often assembled with the shifters and brake levers installed too close to the grips. The positioning of these controls is meant to be adjusted and usually only requires a 4mm or 5mm Allen key (aka hex wrench).
When brake levers are too close, riders will instinctively grab the brakes with more fingers than are needed. This compromises their overall grip on the handlebar. Imagine a driver using both feet to press on the brakes in a car. It works reasonably well for applying full pressure and coming to a hard stop, but it’s difficult to achieve any level of modulation or control and still steer the vehicle. Sliding the brake levers further away from the grips can allow riders to still brake effectively using only 1 finger (max. 2) while keeping the rest of their fingers securely wrapped around the handlebar.
Shifters are the same. Again, the goal is to reach with only one finger or the thumb, while minimizing any repositioning of the hand.
Brake levers can also be angled downward for improved comfort and control. 45 degrees is a great starting point. Most higher end brake levers will include a reach adjustment dial or screw to draw the brake lever closer or further away from the bar.
The bike’s handlebar can also be rolled forward or backward within the stem mount. Even very small changes, 1-2 degrees, should feel noticeable and can help resolve palm numbness or pain that might otherwise send cyclists shopping for new grips. Again, this change often just requires an Allen key.
Lastly, tire pressure is one of the most often overlooked and easiest performance changes a rider can make. It’s important to experiment but also to be consistent. In other words, try different pressures but always take note of the pressure you are using and how it affects traction, rolling speed, and the roughness of the ride. The numbers stamped on the sidewall are quite often too high. 25-30 psi is a better range to explore. A good pump with a gauge is key.
This month’s trail tip: Check your tire pressure before every ride. The right tire pressure can be the difference between having a good ride versus feeling off.
A Single-Track Mind by David D’Agostino